ci/cd-CI/CD部署
推荐 原创什么是CI,什么是CD
CI和CD是软件开发中持续集成和持续交付的缩写。
CI代表持续集成(Continuous Integration),是一种实践,旨在通过自动化构建、测试和代码静态分析等过程,频繁地将代码变更合并到共享存储库中。其目的是快速发现和修复代码问题,确保开发团队对软件产品持续交付。其中,持续指的是在整个开发周期中经常性地进行集成。
CD代表持续交付(Continuous Delivery)和持续部署(Continuous Deployment)。持续交付是一种实践,它将 CI 的结果自动发布到一个暂存区域中,等待进一步的人工测试和批准,然后再将其发布到生产环境中。而持续部署则是将所有 CI 和 CD 步骤无缝集成在一起,以自动化地发布代码到生产环境中。
持续流程
- 代码管理。开发人员使用版本控制系统(如Git)管理主干代码库和分支代码库。
- 触发构建。当代码库中有新的变更提交时,持续集成服务器会自动触发构建过程。这个过程可以由代码仓库的hook机制,在代码被commit/push到远端时调用。也可以通过定时方式来进行构建操作,以便于定期更新构建结果。
- 自动化构建。持续集成服务器会自动从代码库拉取最新代码,并执行构建脚本。构建脚本的具体内容包括代码编译、打包、部署等操作,具体的脚本内容是根据不同项目的需求而定。
- 代码静态分析。在构建过程中,持续集成服务器还会执行代码静态分析以检查潜在的代码错误、安全漏洞等问题。
- 单元测试和集成测试。接下来进行单元测试和集成测试,主要是验证从新提交的代码与已有代码库的兼容性和正确性。
- 报告反馈。持续集成服务器会将构建过程中的错误、测试结果以及代码指标(如代码覆盖率、静态分析结果等)呈现到一个易于阅读的报告中,这些报告可以使团队更好地了解开发过程中出现的问题。
- 部署操作。如果构建,测试和分析都成功完成,则可以将最新代码部署到生产环境或其他目标环境中。
总之,持续集成的流程可帮助团队快速检测代码问题并进行修复,减少代码冲突时间和重复劳动,提高软件交付质量和效率。
持续部署方案:
使用第三方云产品:如阿里云的云效、腾讯云的CODING DevOps
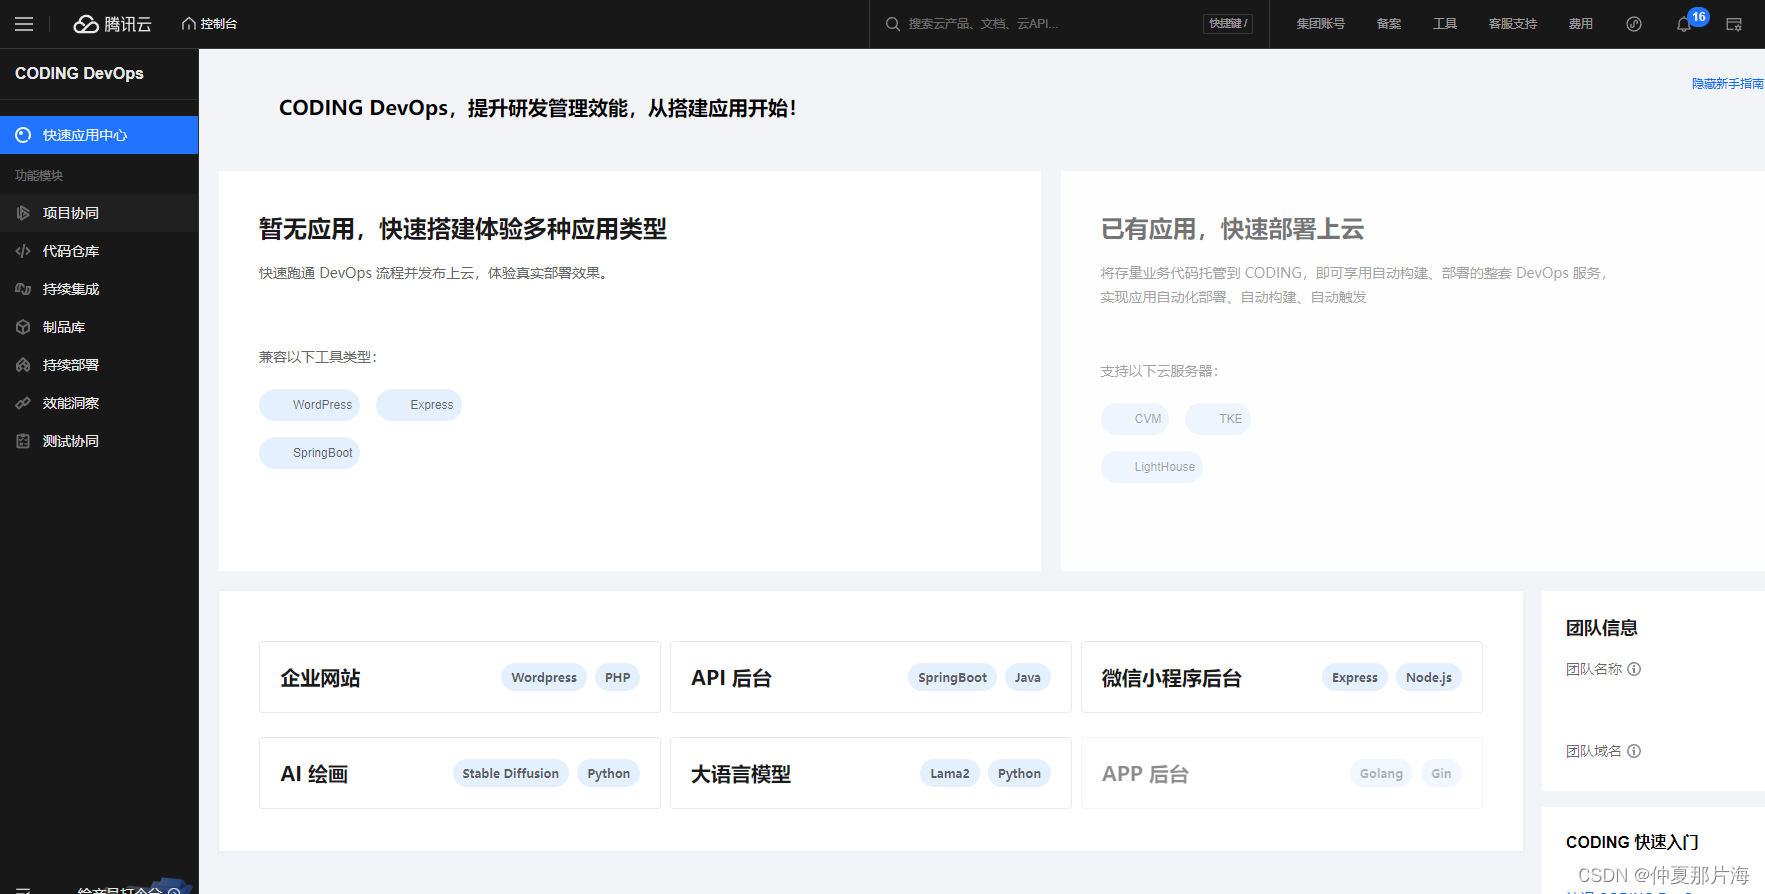
1、腾讯云的CODING DevOps
2、阿里云

CI/CD云产品的使用
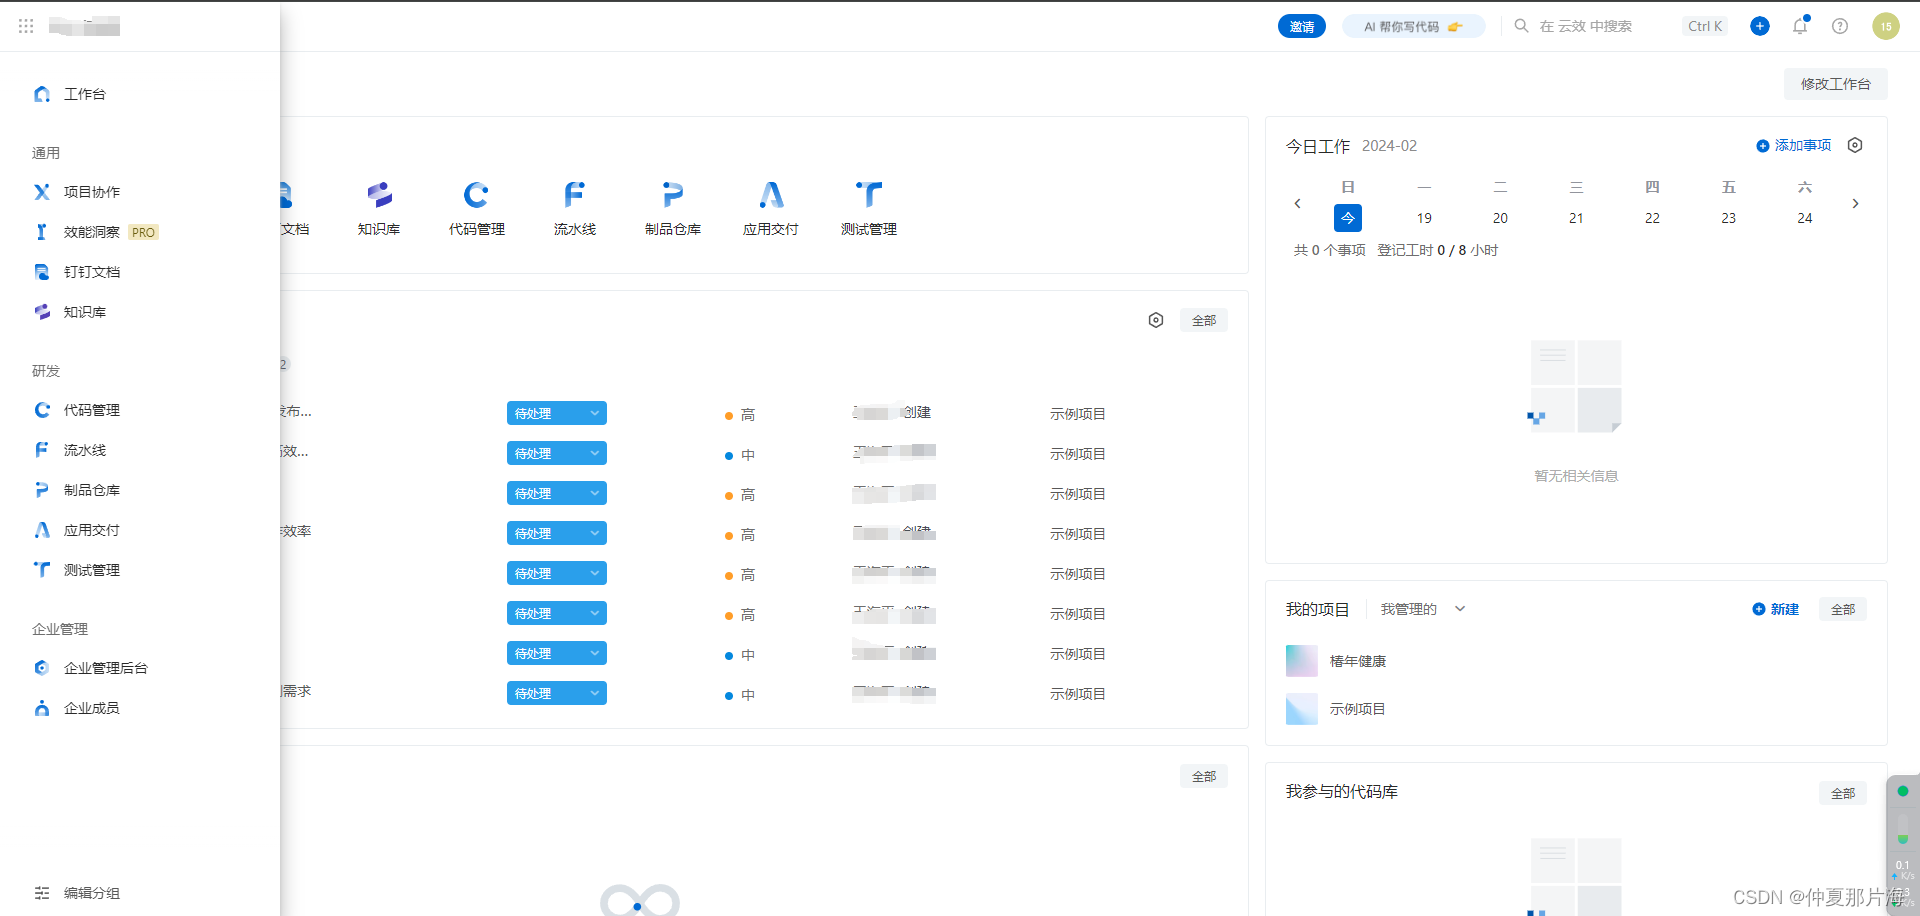
下面就以云效介绍为主,云效是阿里云提供的免费企业管理平台,其中可用的应用有项目协作、代码仓库、流水线管理、制品仓库、测试管理
链接:https://accountid-devops.aliyun.com/
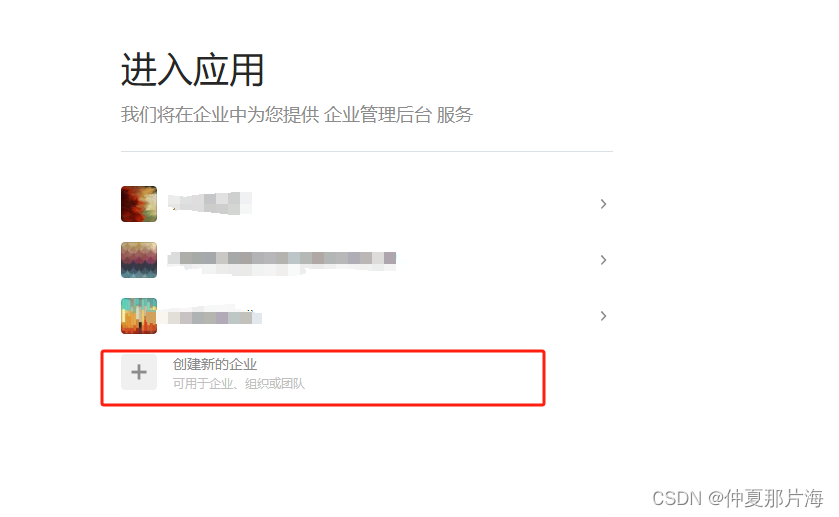
进入链接首次会让新建企业(一般是管理员去创建企业,成员只是跟据管理员发来的邀请链接加入),
以下重点介绍代码管理、流水线、制品管理
代码管理
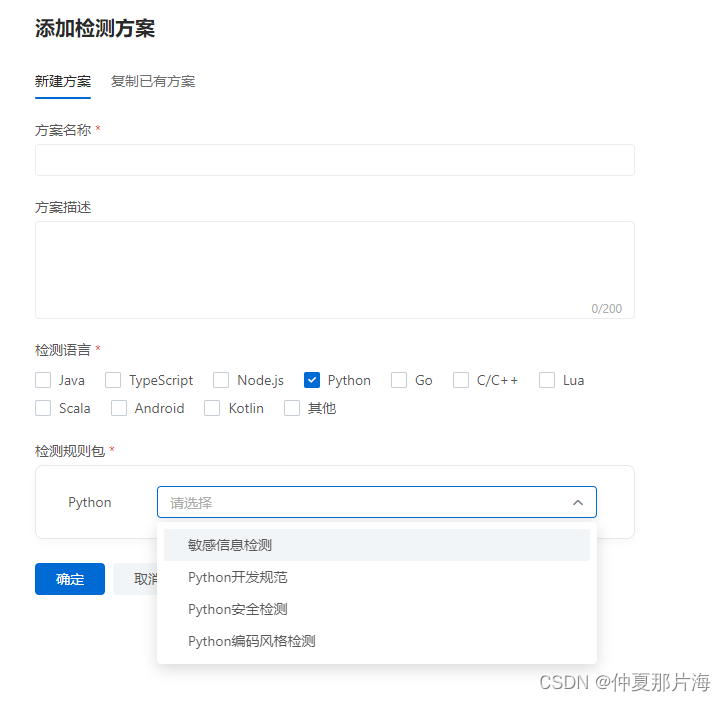
代码仓库中重点介绍代码检测,就是对提交的代码进行检测,检测不通过就不进行提交
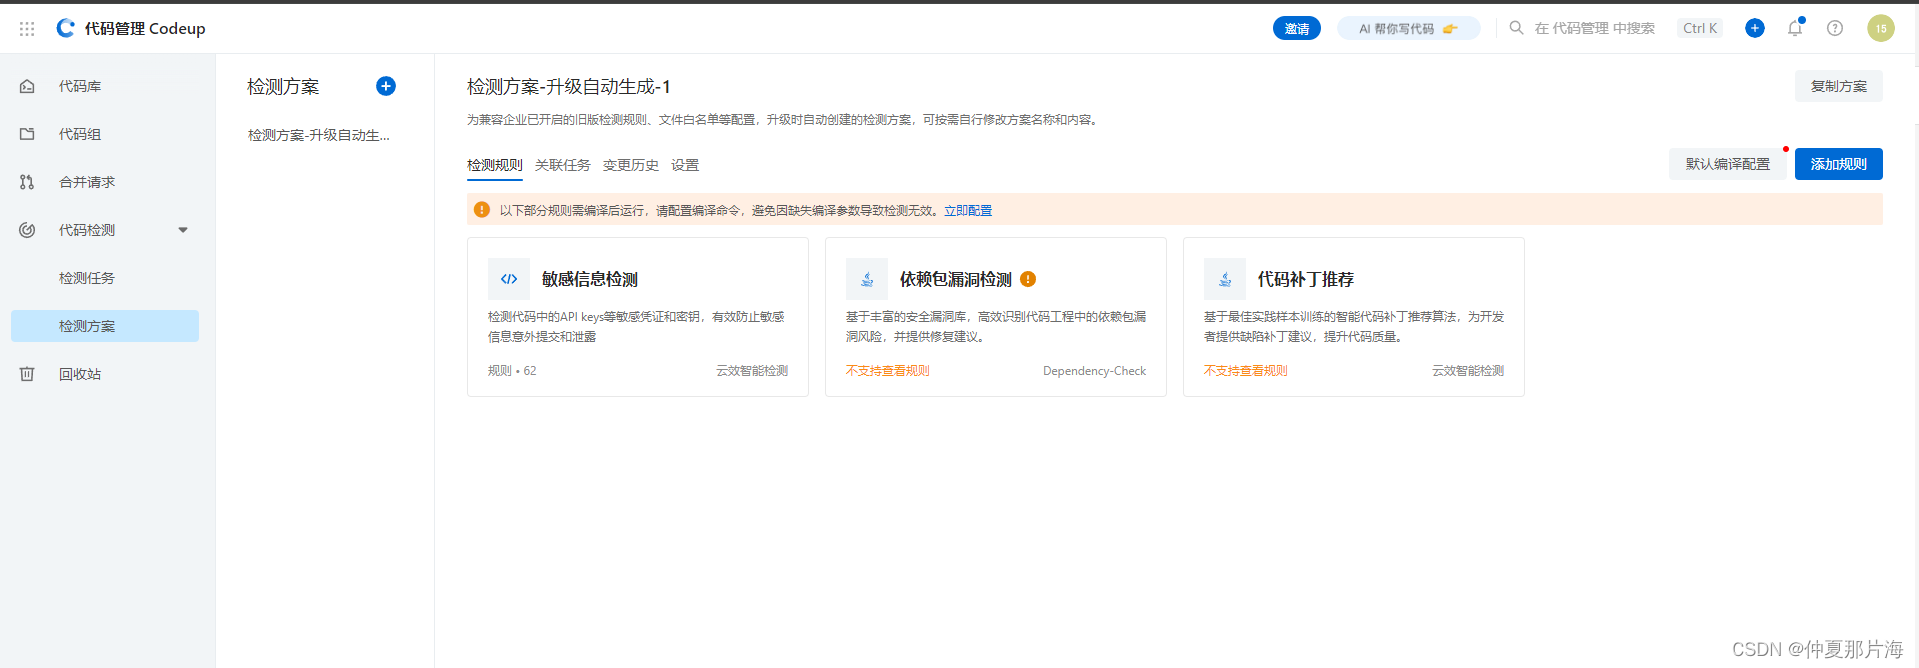
检测规则可以多选
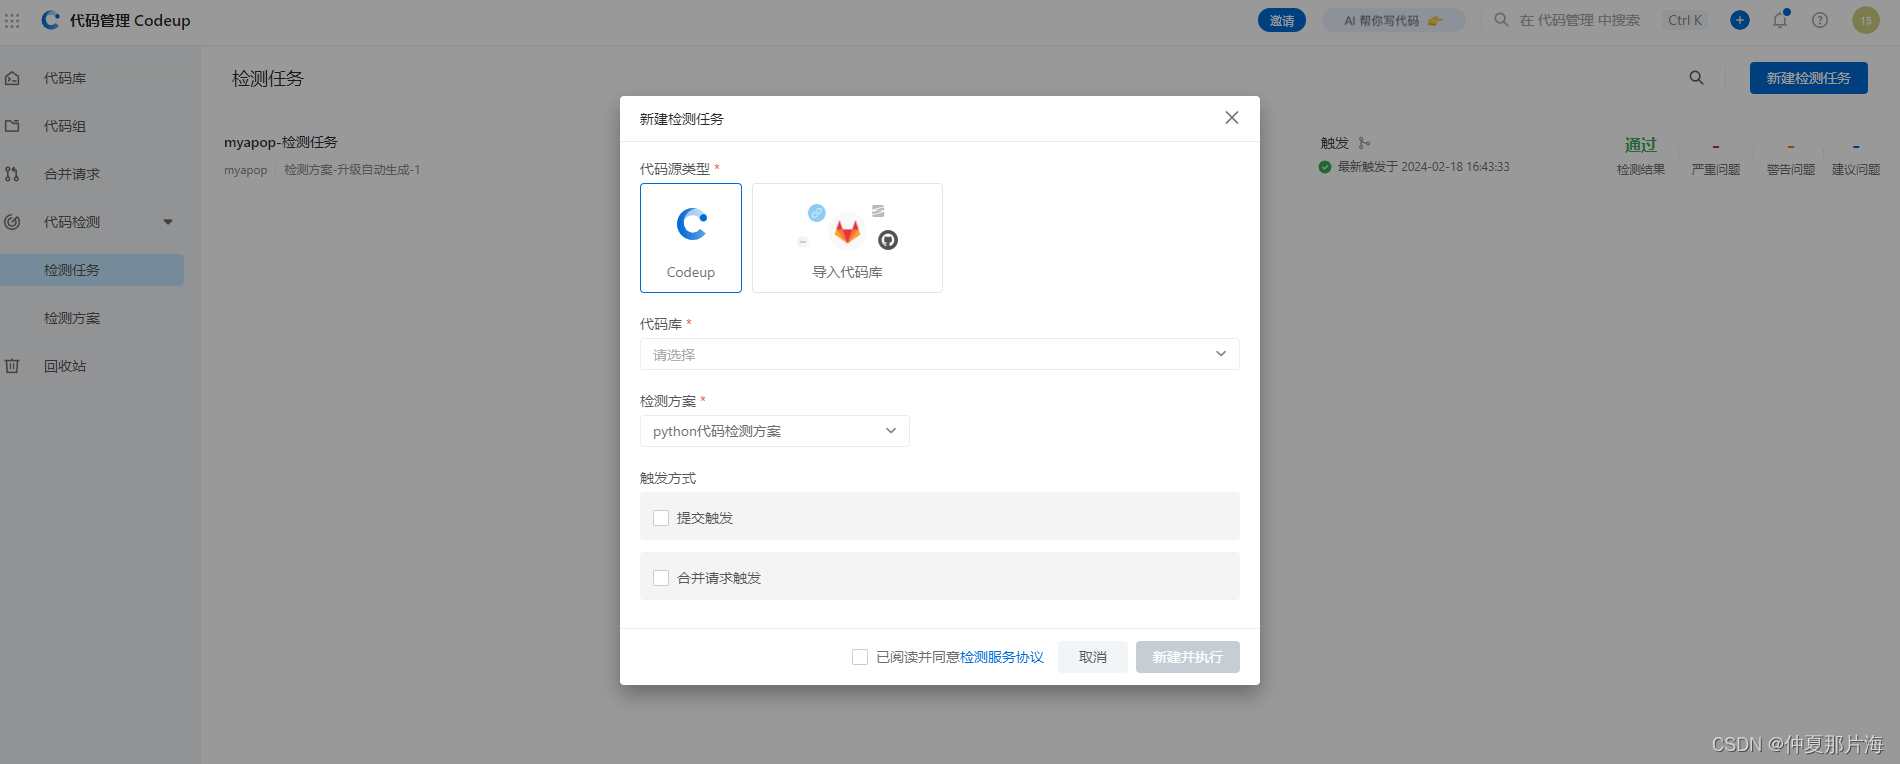
配置好检测方案后就可以进行检测任务的创建了,就可以配置代码仓库的关联触发。也可以导入其他的代码仓库地址
流水线
流水线就是控制代码自动化部署的配置,能实现CI/CD的持续集成发布的功能,在流水线中可以自动配置代码的检测

流水线部署方案选择
在新建的流水线中可选部署的方案
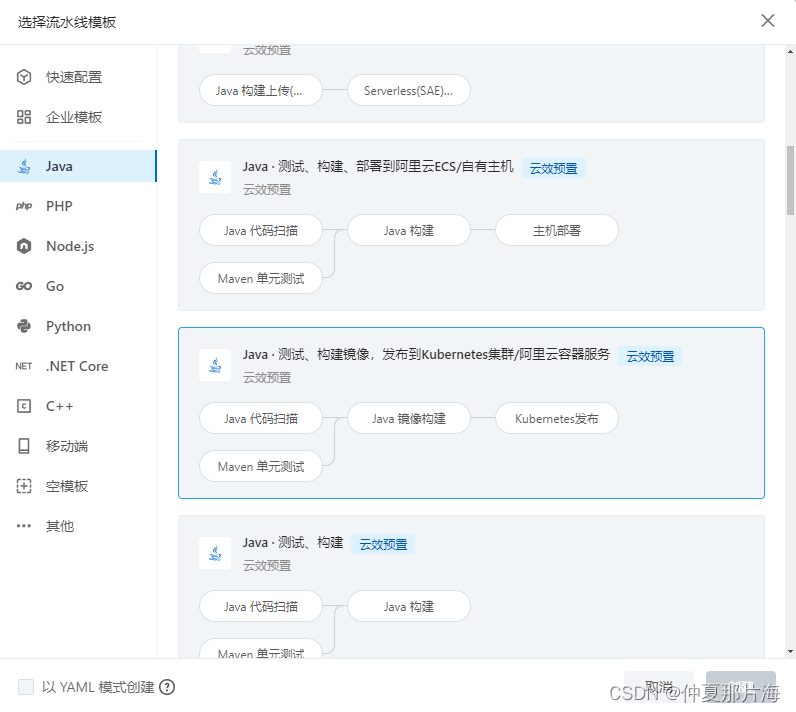
选择自己适用的部署方案,进行每个任务的编辑
配置流水线的源头。
源头可以分为现有的代码仓库的地址。和已经有的制品源地址。也可以是某流水线的源头
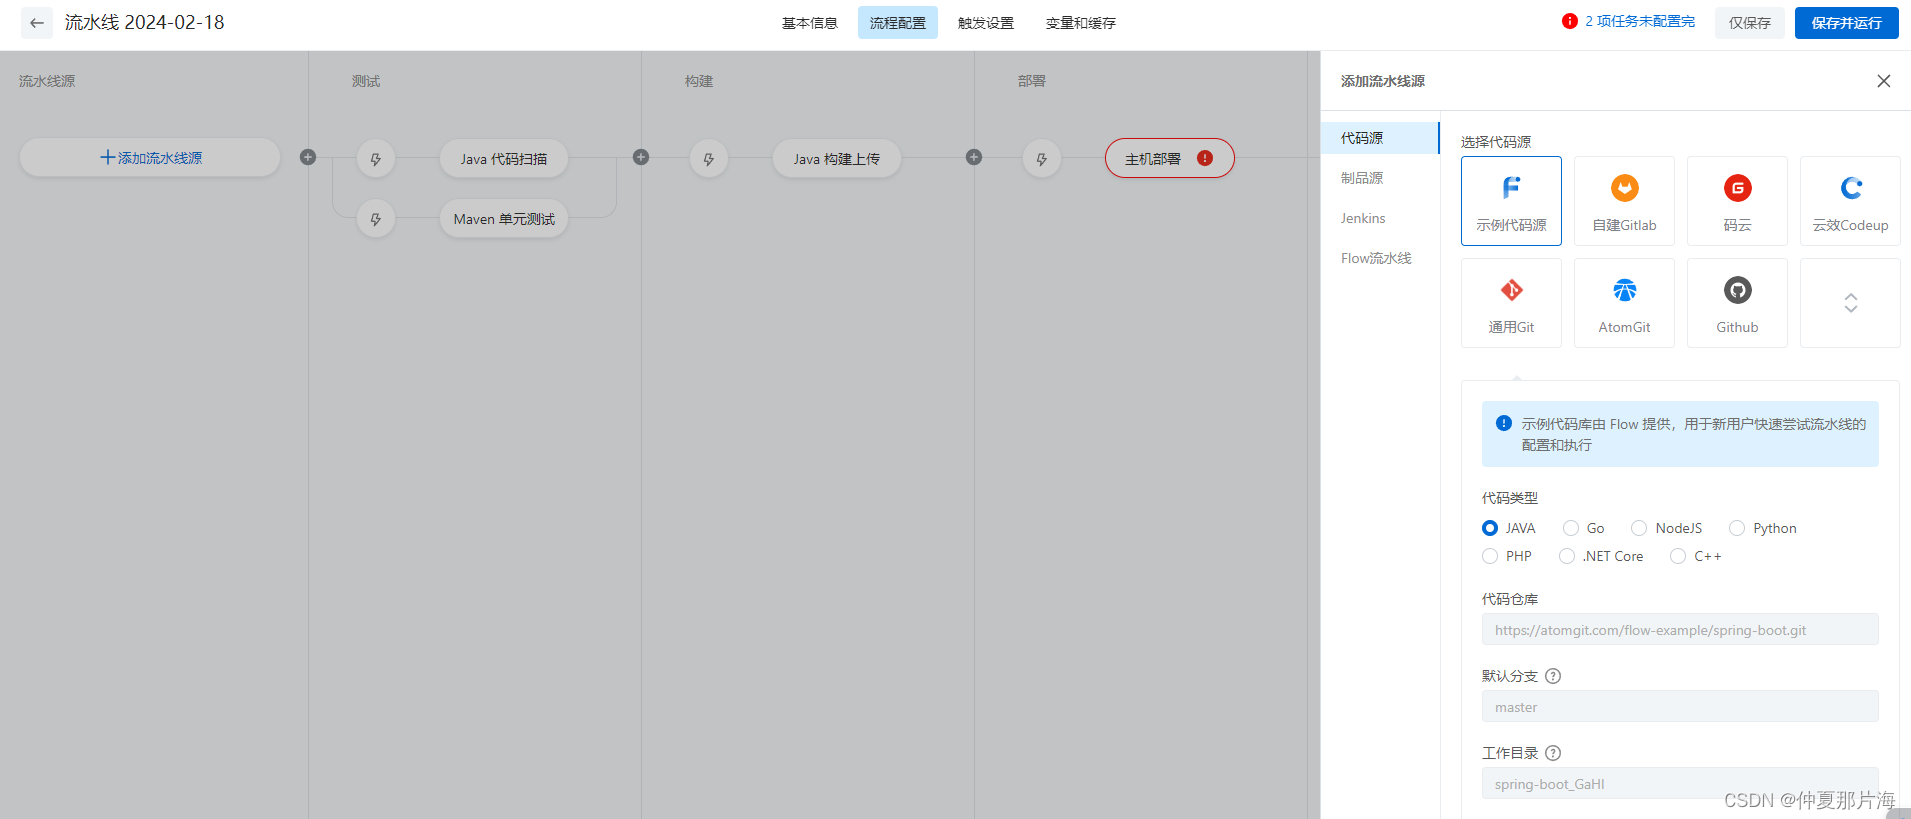
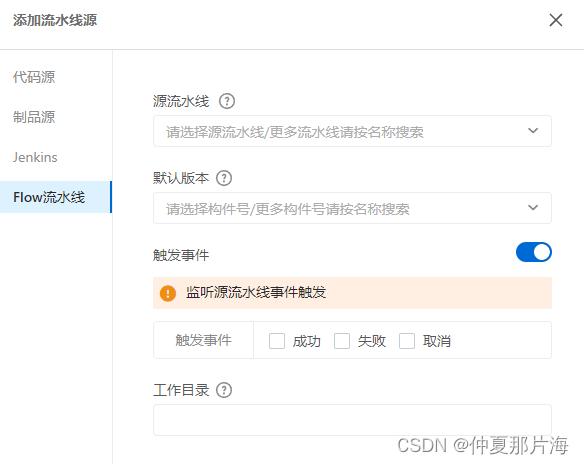
各流程具体编辑
代码扫描
具体的命令参数和路径,部署的主机信息
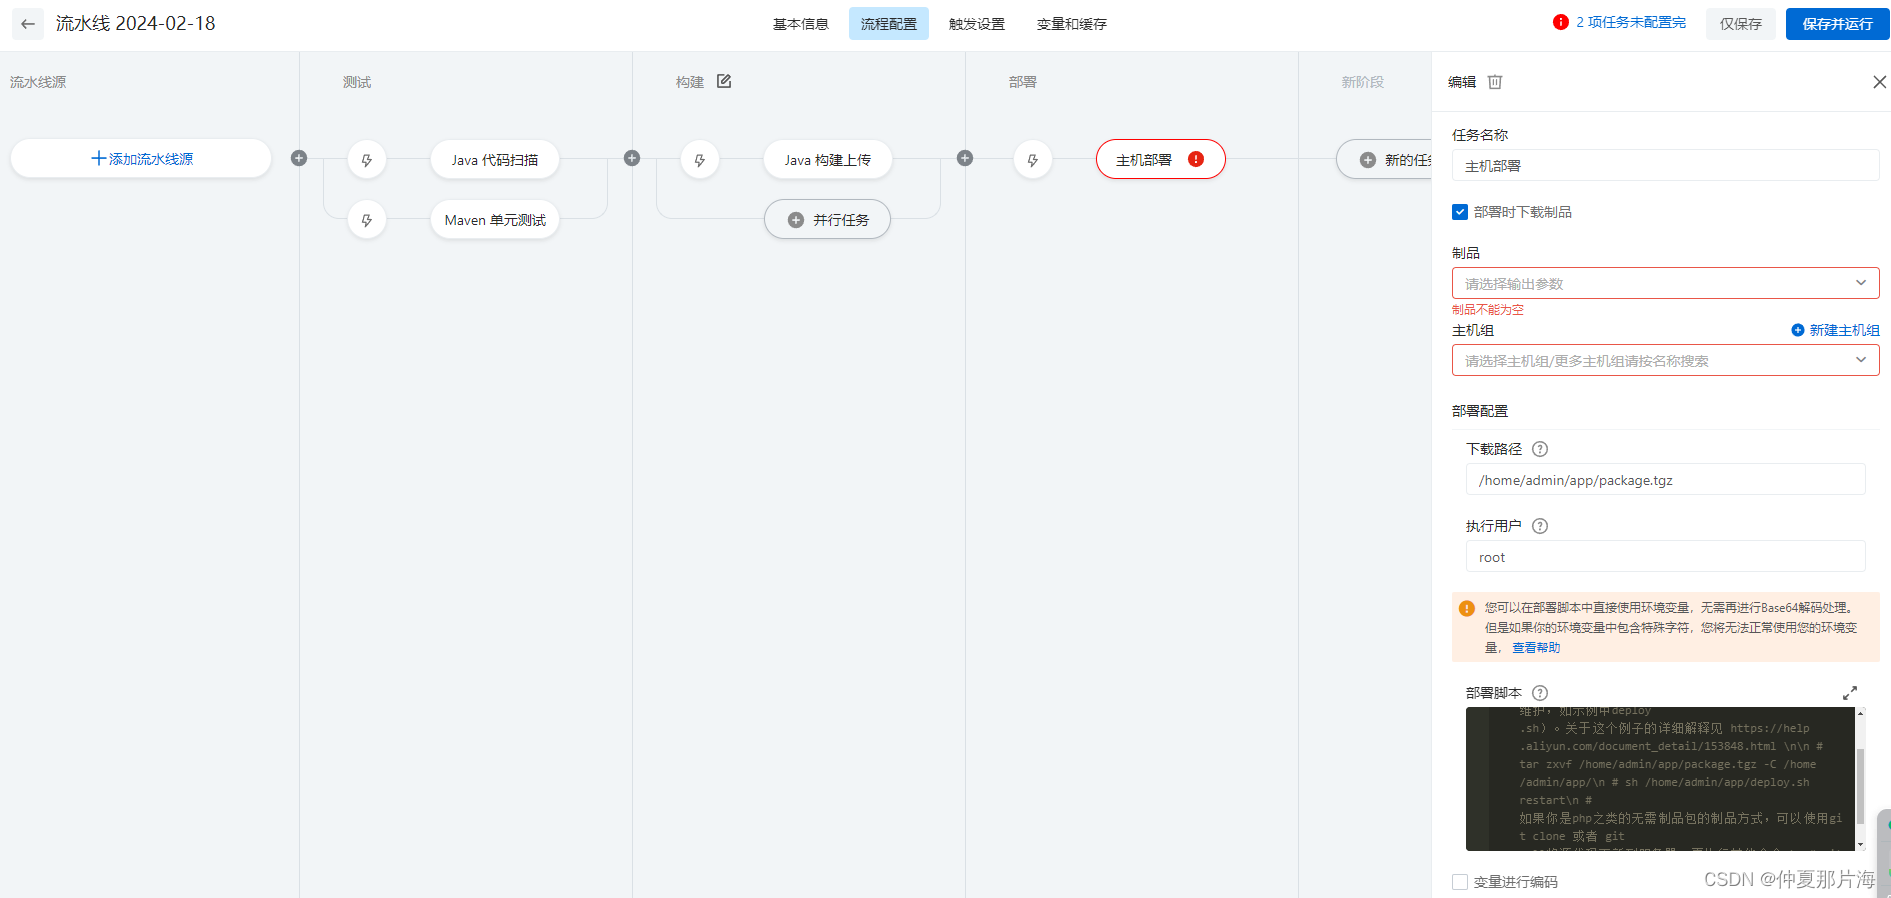
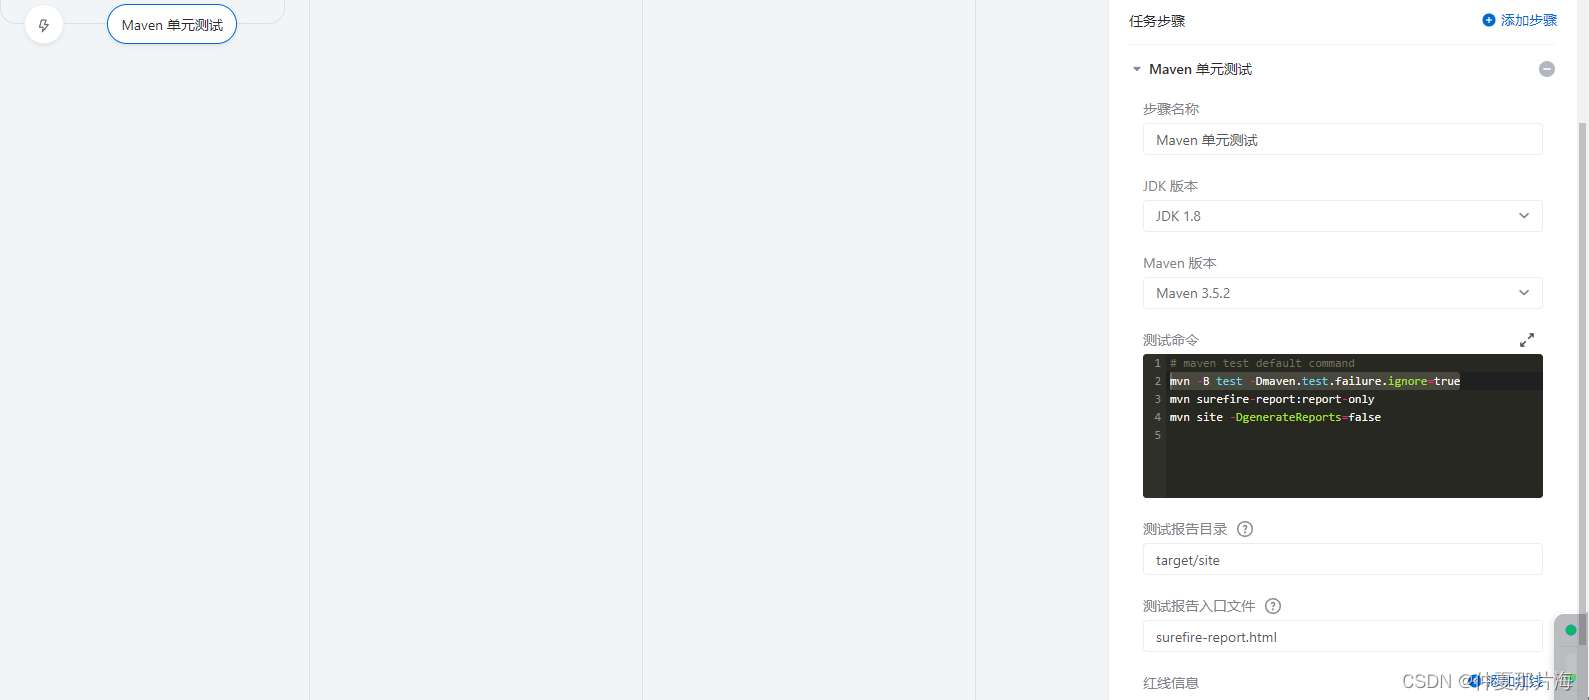
单元测试编辑
部署好单元测试的命令及测试报告文件的入口文件
构建上传
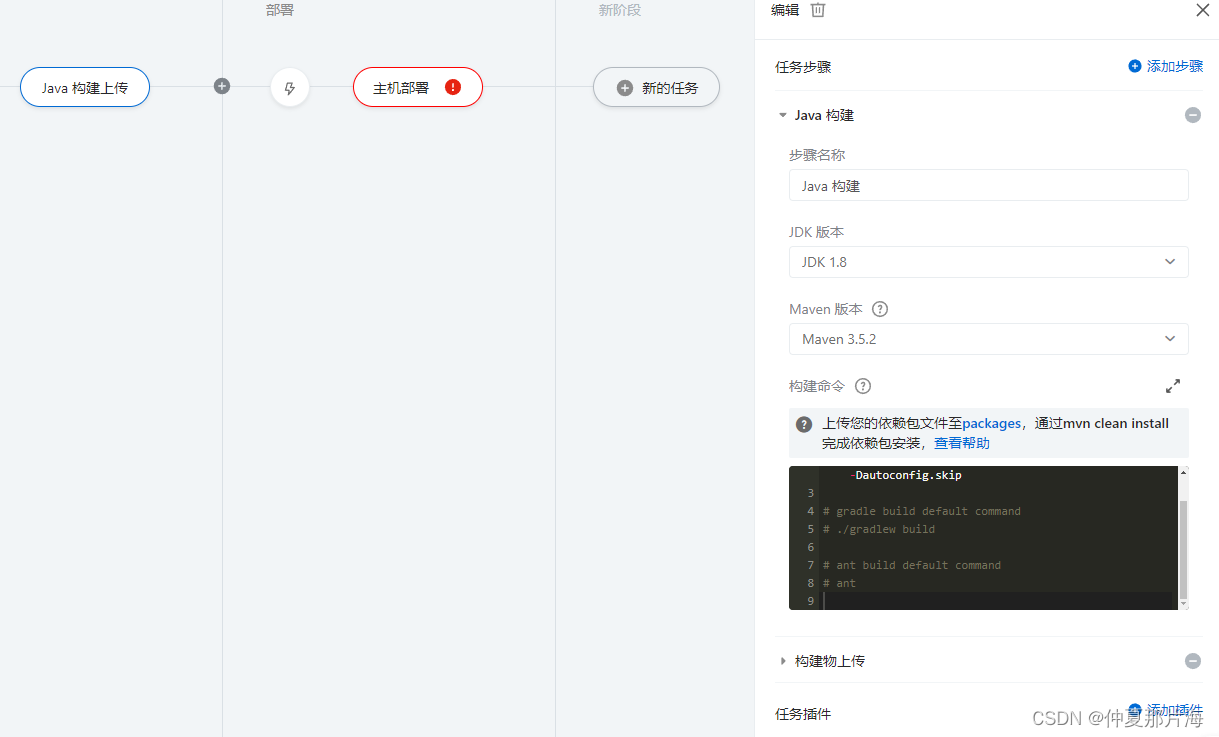
主机信息配置
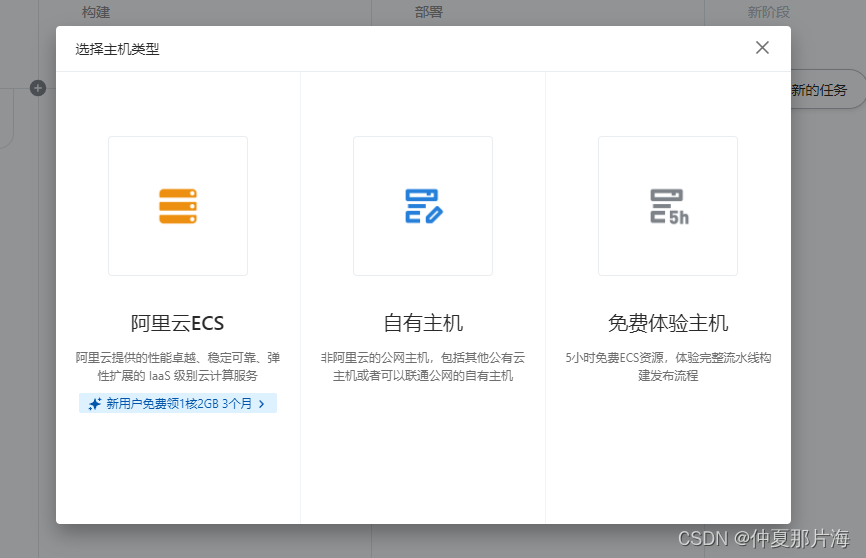
制品管理
制品是向服务器发送的部署包,是压缩文件的类型,方便文件传输,方便代码的回滚和管理

自己部署 Gitlab+jenkins
jenkins概述:
Jenkins是一种开源的自动化服务器软件,最初是Hudson项目的分支。它提供了构建、测试和部署软件项目的持续集成(CI)和持续交付(CD)功能。
Jenkins可以自动化执行各种任务,如构建代码、运行测试、检查代码质量等。通过使用丰富的插件生态系统,Jenkins能够与许多其他工具和技术集成,包括Docker、Git、GitHub、SVN、Maven等等。
jenkins特点:
- 高度可扩展。Jenkins有一个强大的插件框架,使得用户可以自由地选择需要的功能并将其添加到Jenkins中。
- 易于设置和使用。Jenkins的安装和配置非常简单,并且有良好的文档和社区支持。
- 自动化构建和测试。Jenkins可以自动从版本控制库中获取代码,进行编译、构建、测试和发布等操作。
- 安全性。Jenkins提供了一系列的安全功能来保护您的构建环境和数据,如用户身份验证、访问控制等。
- 多平台支持。Jenkins可以在Windows、Linux和Mac OS X等多个操作系统上运行。
gitlab概述:
GitLab是一个基于Git版本控制系统的、用于存储和管理代码的Web托管服务。它提供了代码仓库管理、问题追踪、CI/CD等一系列软件开发所需的功能。
gitlab特点:
- 完整的Git工作流程管理。GitLab自带有完整的Git工作流程管理,可以方便地管理代码库的分支、合并、提交等操作。
- 内置CI/CD功能。GitLab内置了强大的CI/CD工具,可以让用户轻松地配置和管理持续集成和持续部署过程。
- 集成的项目管理。除了基本的Git操作以外,GitLab还包含了项目管理、问题跟踪、Wiki、代码审查、安全性扫描等功能,允许团队更加高效地协同开发。
- 在线编辑器。GitLab带有在线编辑器,允许您在浏览器中直接编辑文件,而无需在本地环境中安装Git客户端。
- 强化的安全性管理。GitLab提供了多重身份验证(MFA)、LDAP、SAML、TFA等多种安全性管理方式,保证应用程序和数据的安全性。
#配置阿里云仓库
wget http://mirrors.aliyun.com/repo/Centos-7.repo
mv Centos-7.repo /etc/yum.repos.d/
yum install -y epel-release

#安装gitlab所需组件
yum -y install curl policycoreutils openssh-server openssh-clients postfix policycoreutils-python.x86_64

#默认,使用postfx发送邮件
systemctl enable postfix --now

#从本地下载gitlab包
https://mirrors.tuna.tsinghua.edu.cn/gitlab-ce/yum/el7/

#或者配置yum仓库

vim /etc/yum.repo.d/gitlab.repo
[gitlab]
name=gitlab
baseurl=https://mirrors.tuna.tsinghua.edu.cn/gitlab-ce/yum/el7/
repo_gpgcheck=0
enabled=1
gpgcheck=0

yun -y install gitlab-ce

#我选择的从本地下载,上传
#解包
rpm -ivh gitlab-ce-15.9.4-ce.0.el7.x86_64.rpm

[root@localhost ~]# rpm -ivh gitlab-ce-15.9.4-ce.0.el7.x86_64.rpm
警告:gitlab-ce-15.9.4-ce.0.el7.x86_64.rpm: 头V4 RSA/SHA1 Signature, 密钥 ID f27eab47: NOKEY
准备中...                          ################################# [100%]
正在升级/安装...
   1:gitlab-ce-15.9.4-ce.0.el7        ################################# [100%]
It looks like GitLab has not been configured yet; skipping the upgrade script.

       *.                  *.
      ***                 ***
     *****               *****
    .******             *******
    ********            ********
   ,,,,,,,,,***********,,,,,,,,,
  ,,,,,,,,,,,*********,,,,,,,,,,,
  .,,,,,,,,,,,*******,,,,,,,,,,,,
      ,,,,,,,,,*****,,,,,,,,,.
         ,,,,,,,****,,,,,,
            .,,,***,,,,
                ,*,.


     _______ __  __          __
    / ____(_) /_/ /   ____ _/ /_
   / / __/ / __/ /   / __ `/ __ \
  / /_/ / / /_/ /___/ /_/ / /_/ /
  \____/_/\__/_____/\__,_/_.___/


Thank you for installing GitLab!
GitLab was unable to detect a valid hostname for your instance.
Please configure a URL for your GitLab instance by setting `external_url`
configuration in /etc/gitlab/gitlab.rb file.
Then, you can start your GitLab instance by running the following command:
  sudo gitlab-ctl reconfigure

For a comprehensive list of configuration options please see the Omnibus GitLab readme
https://gitlab.com/gitlab-org/omnibus-gitlab/blob/master/README.md

Help us improve the installation experience, let us know how we did with a 1 minute survey:
https://gitlab.fra1.qualtrics.com/jfe/form/SV_6kVqZANThUQ1bZb?installation=omnibus&release=15-9


#安装完成后修改访问地址
vim /etc/gitlab/gitlab.rb
....
external_url 'http://192.168.100.10'
....

#修改完后重置gitlab(时间较长,5分钟左右)
gitlab-ctl reconfigure


#到最后看到gitlab Reconfigured!就OK了
#浏览器访问时内存要大于4G,不然内存不足会报501,另外注意防火墙规则
#初始密码在/etc/gitlab/initial_root_password
cat /etc/gitlab/initial_root_password

[root@localhost ~]# cat /etc/gitlab/initial_root_password
# WARNING: This value is valid only in the following conditions
#          1. If provided manually (either via `GITLAB_ROOT_PASSWORD` environment variable or via `gitlab_rails['initial_root_password']` setting in `gitlab.rb`, it was provided before database was seeded for the first time (usually, the first reconfigure run).
#          2. Password hasn't been changed manually, either via UI or via command line.
#
#          If the password shown here doesn't work, you must reset the admin password following https://docs.gitlab.com/ee/security/reset_user_password.html#reset-your-root-password.

Password: 0kevvItShgNxHYdvPywLB1hBDTtidJf7TWAlXvymKkU=

# NOTE: This file will be automatically deleted in the first reconfigure run after 24 hours.

Password后边的是初始密码


#初始化密码
gitlab-rake "gitlab:password:reset[root]"

[root@localhost bin]# gitlab-rake "gitlab:password:reset[root]"
Enter password:
Confirm password:
Password successfully updated for user with username root.

#密码必须8个以上的字符,最好为字母+数字

or


# 进入控制台
gitlab-rails console -e production
# 查询id为1的用户,id为1的用户是超级管理员
user = User.where(id:1).first
# 修改密码为lyh20030930
user.password='lyh20030930'
user.password_confirmation = 'lyh20030930'
# 保存
user.save!
#退出
exit
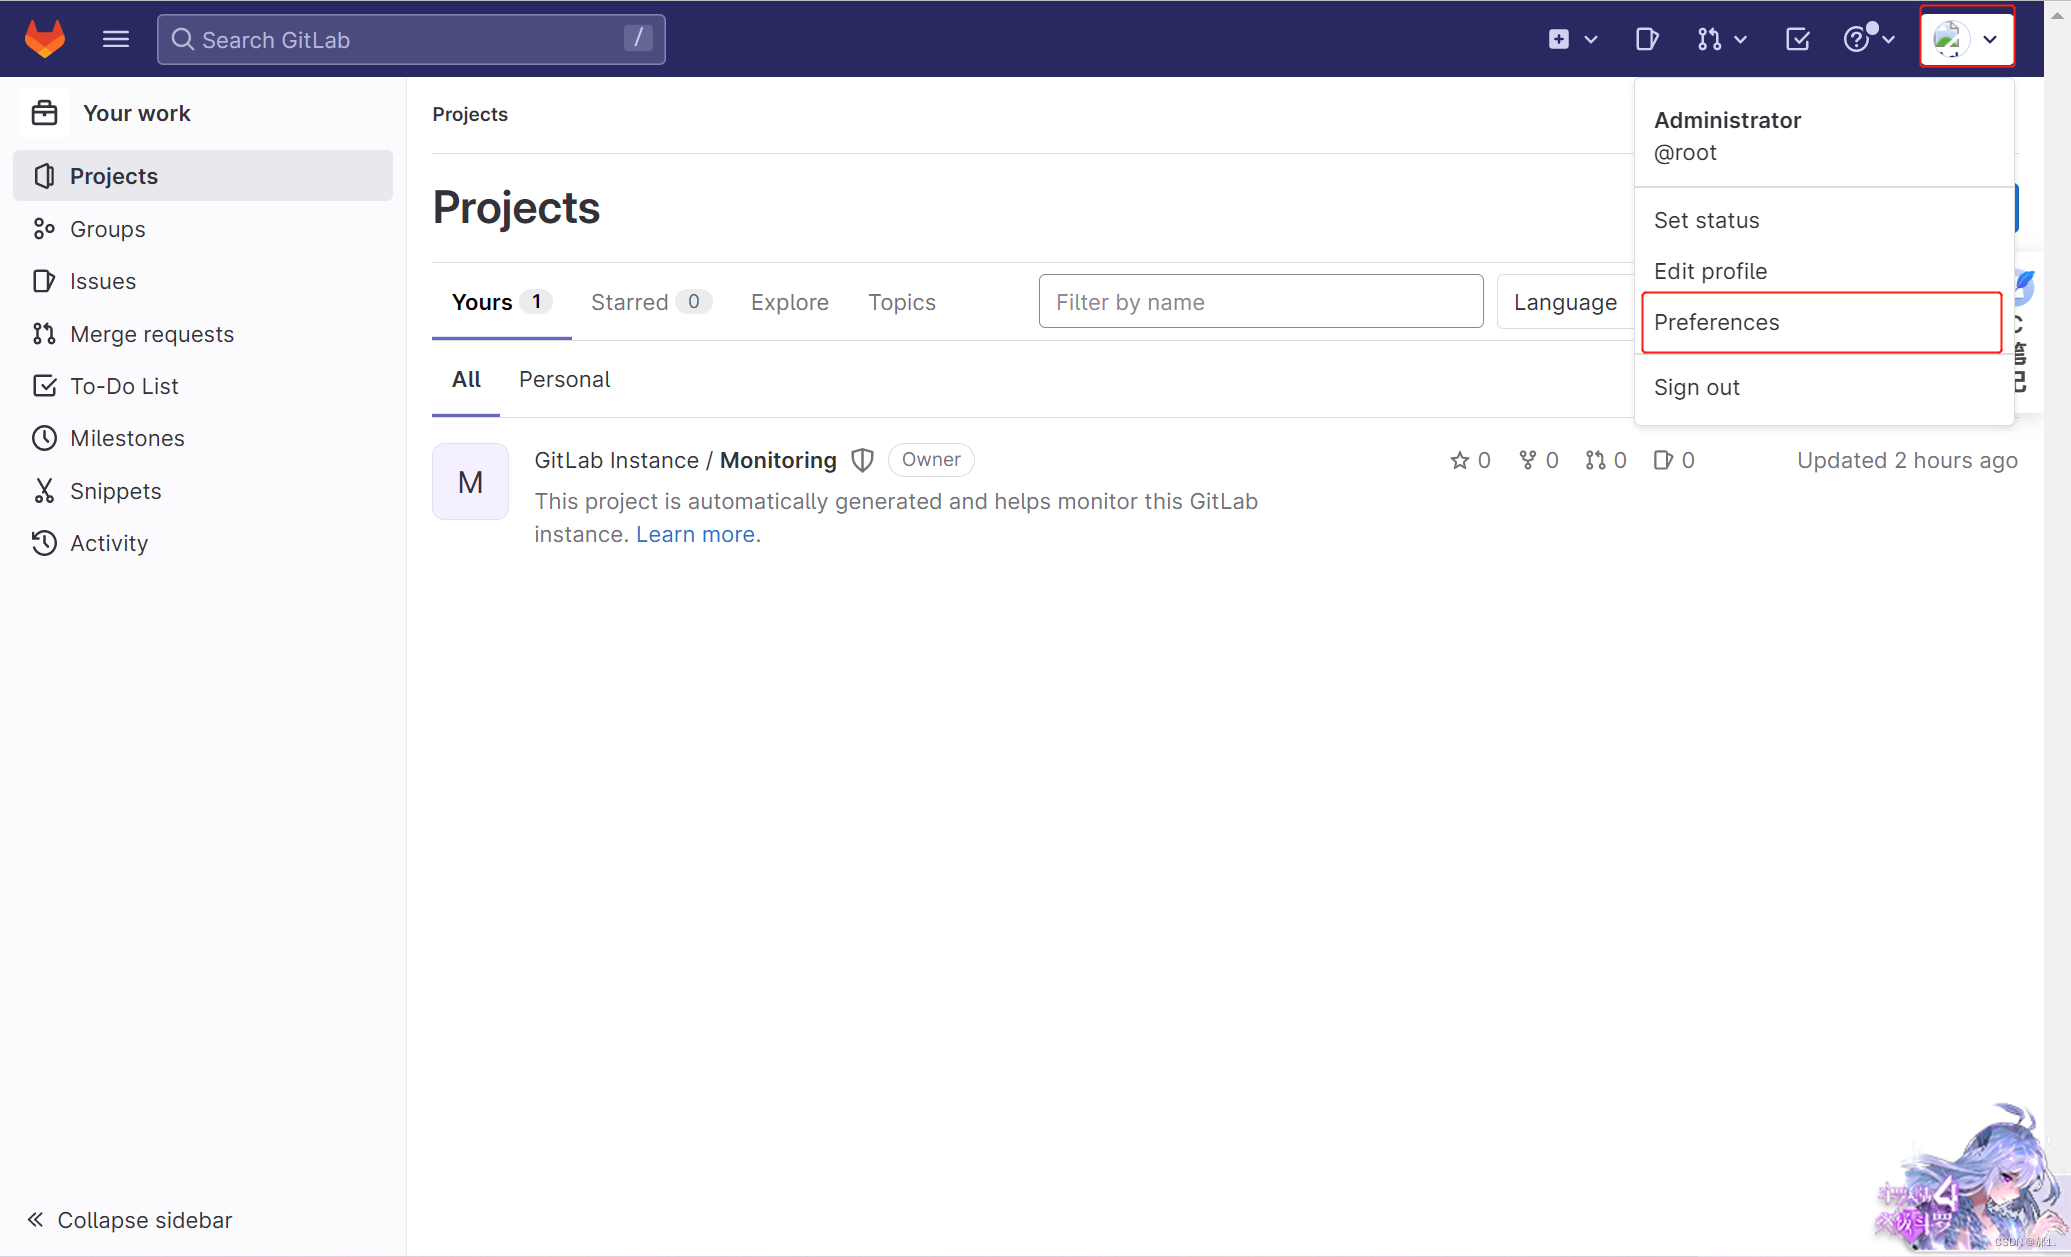
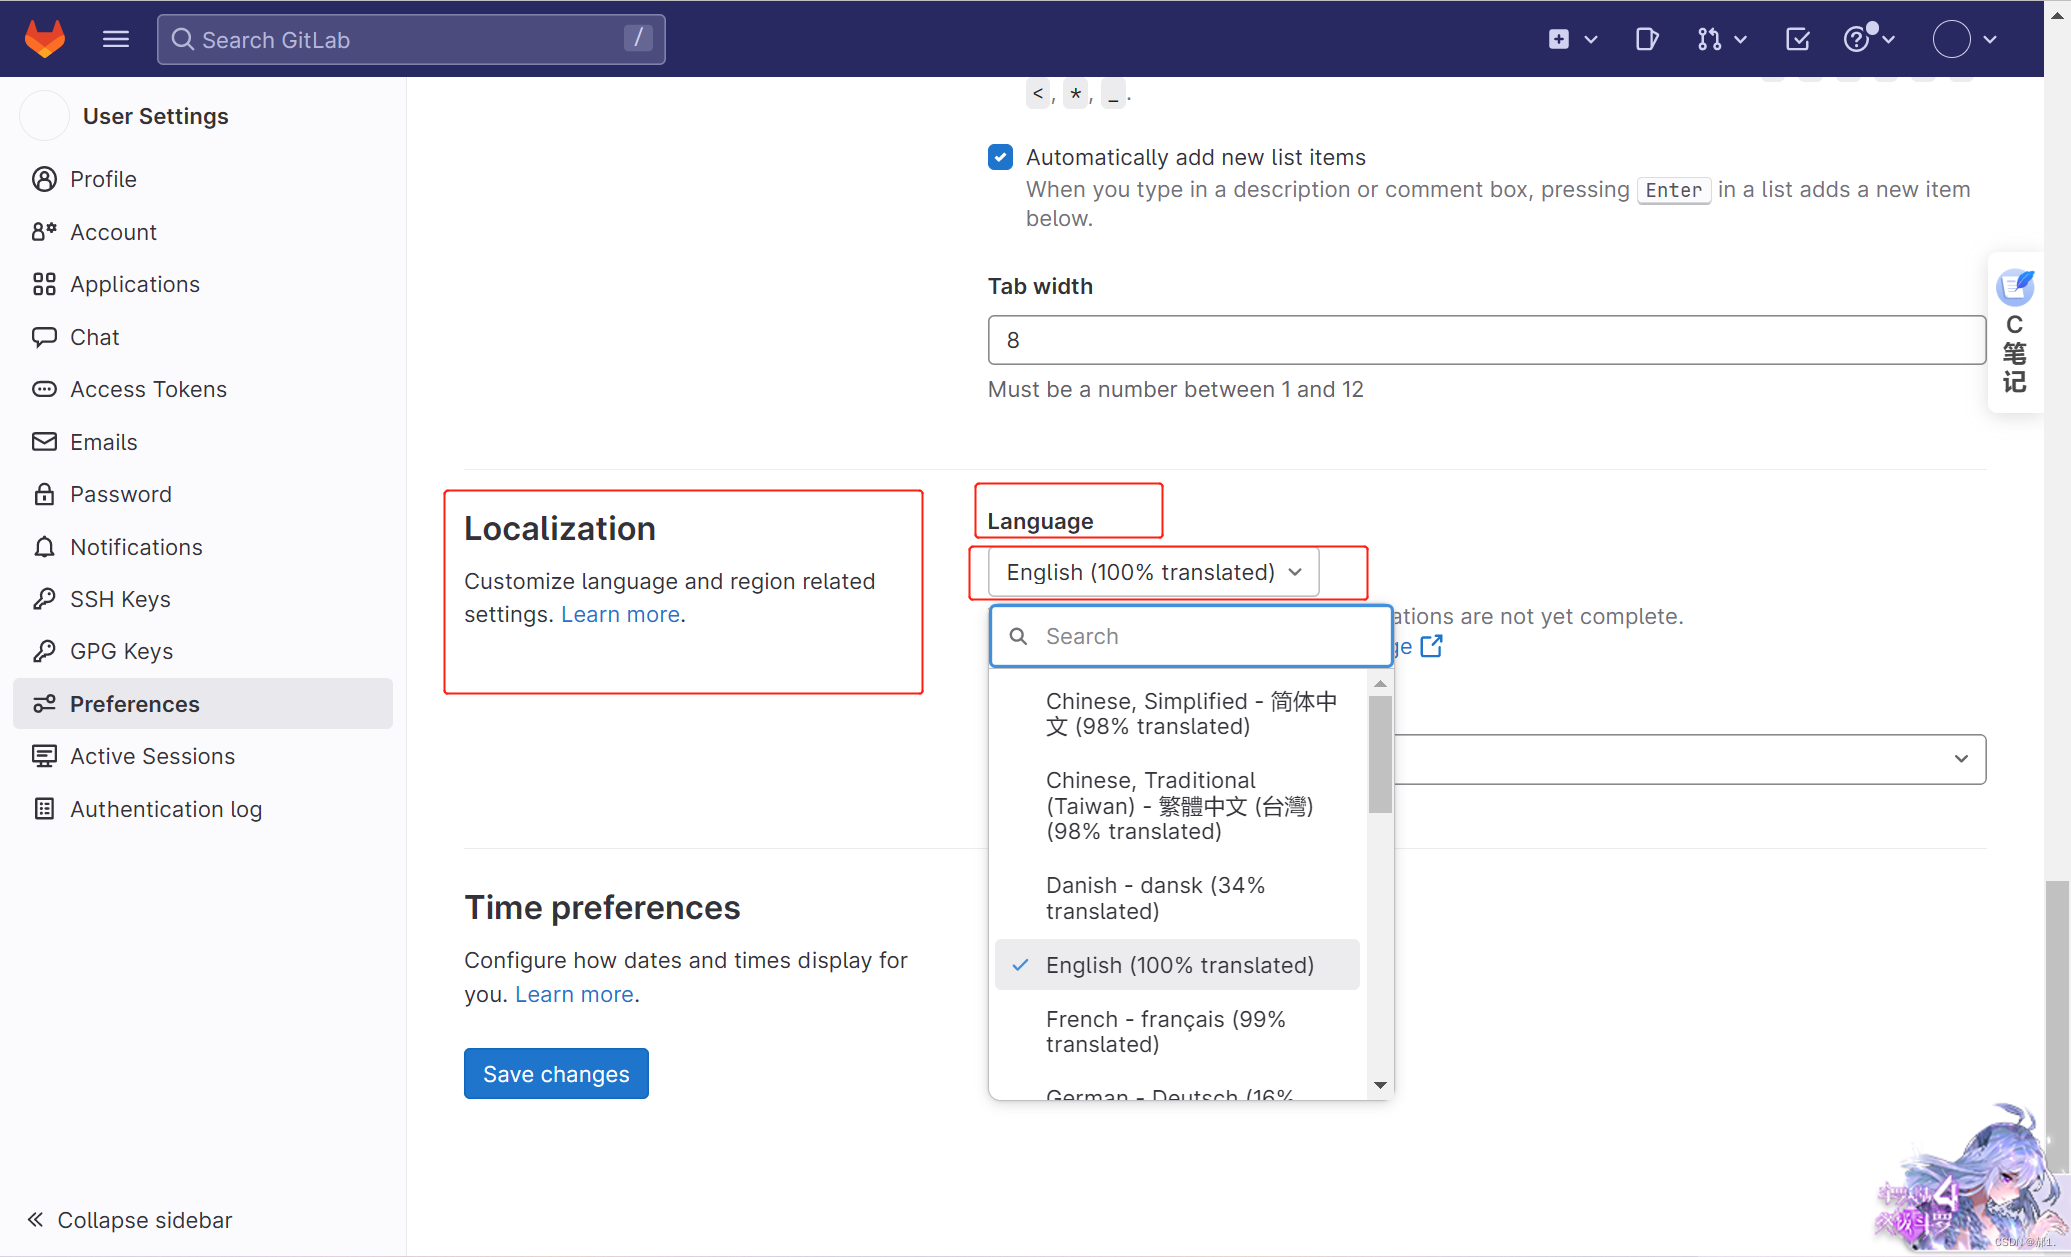
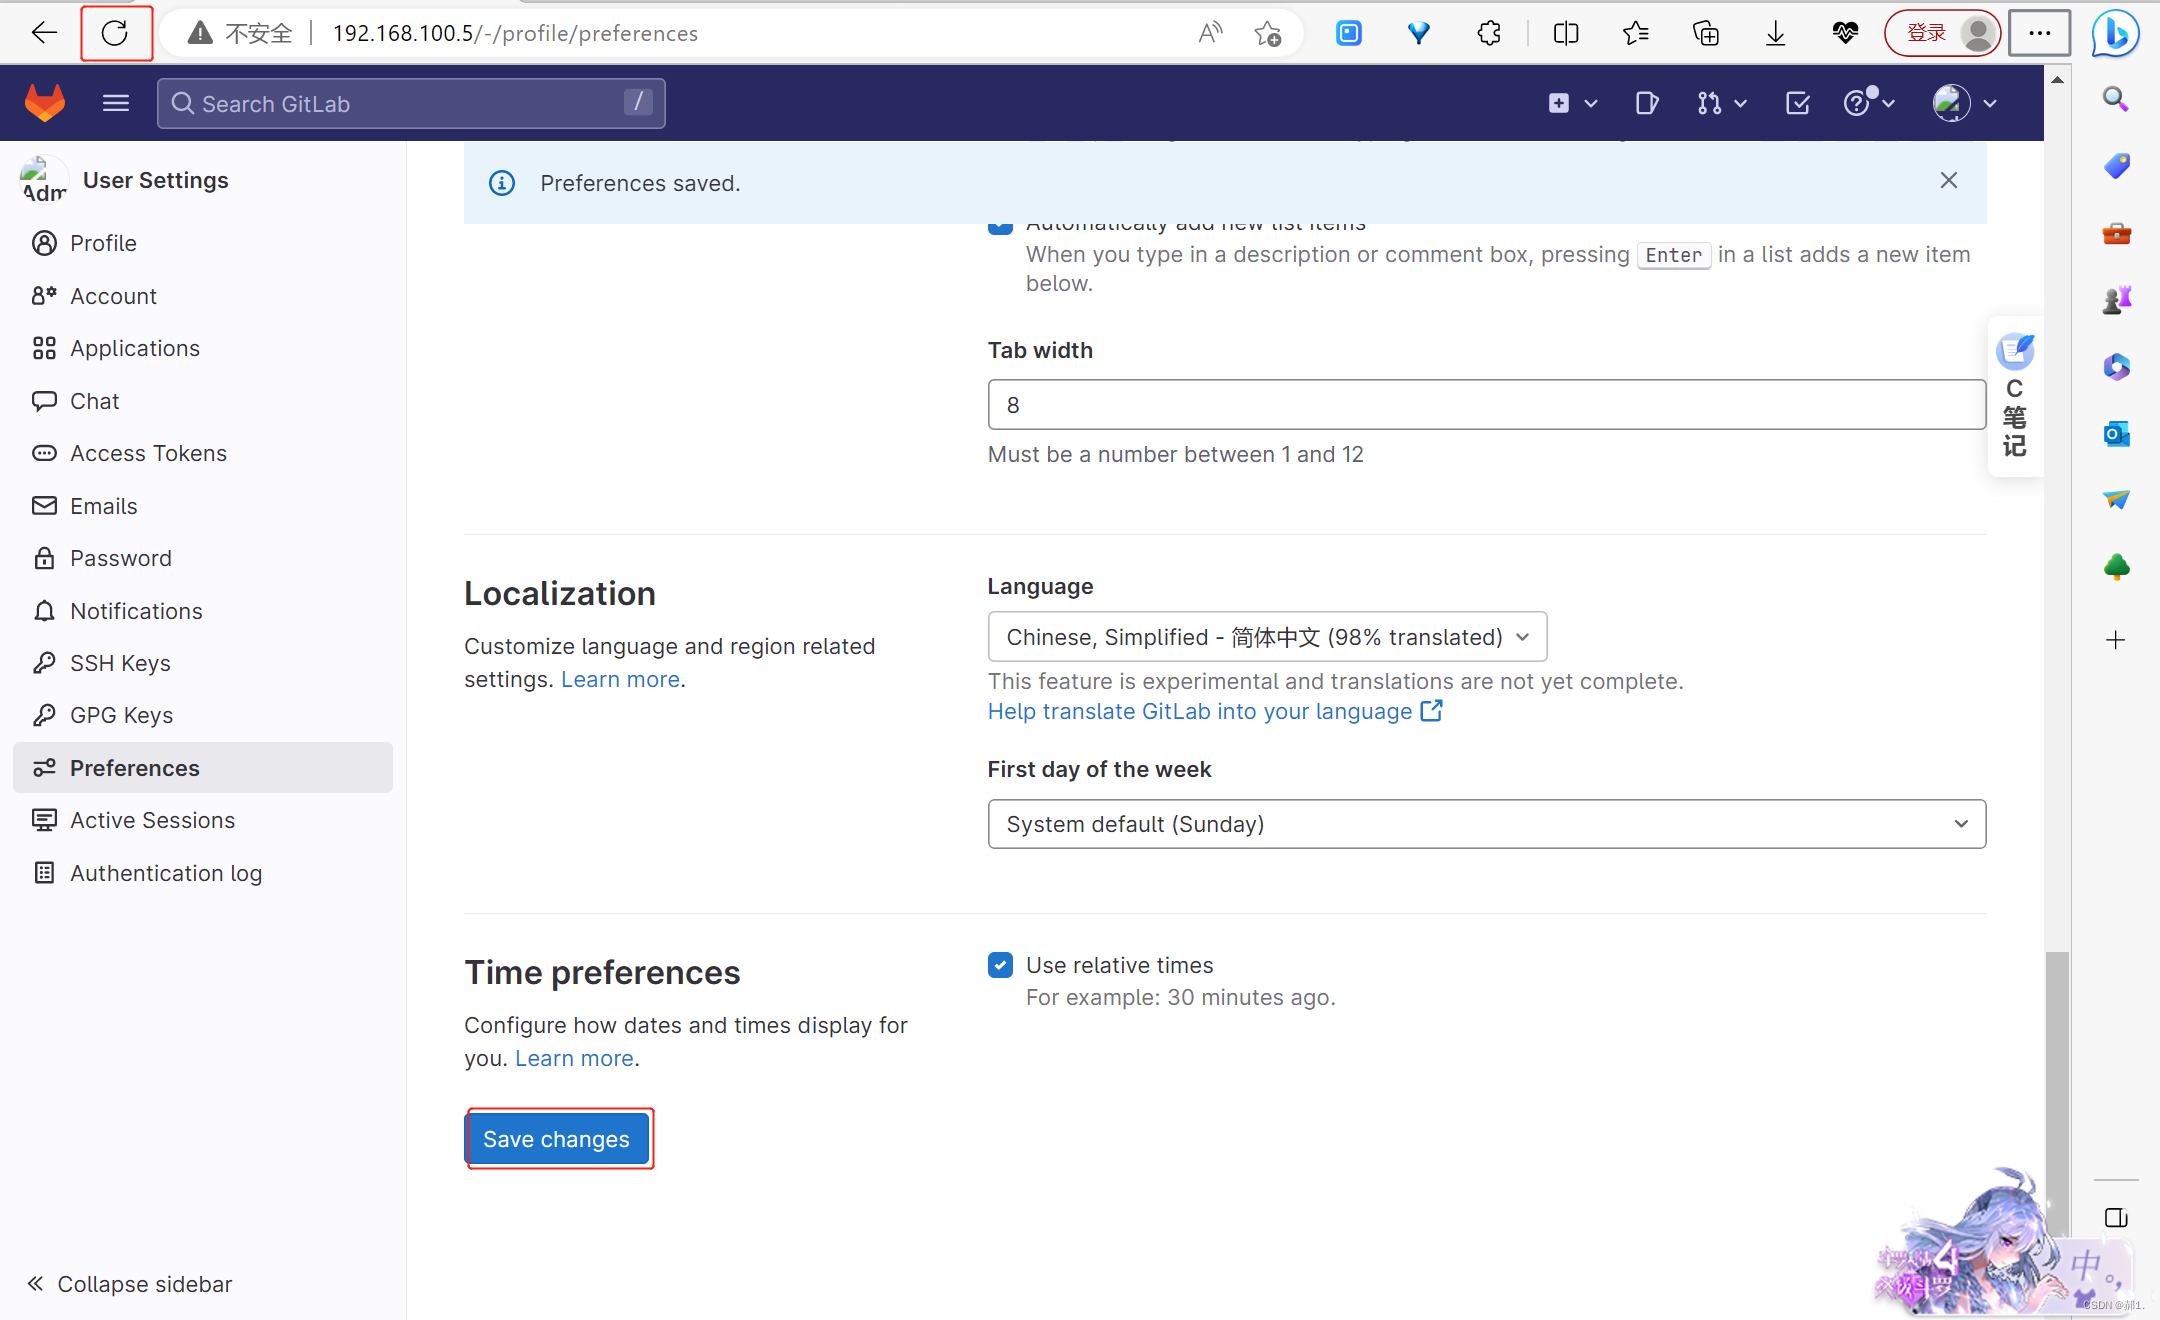
局部汉化
更多【ci/cd-CI/CD部署】相关视频教程:www.yxfzedu.com
相关文章推荐
- flink-flink1.18.0 macos sql-client.sh启动报错 - 其他
- .net-Ubuntu安装.Net SDK - 其他
- 论文阅读-论文阅读:LOGO-Former: Local-Global Spatio-Temporal Transformer for DFER(ICASSP2023) - 其他
- 数码相机-深度图(Depth Map) - 其他
- c#-C#在.NET Windows窗体应用中使用LINQtoSQL - 其他
- flink-flink的CoProcessFunction使用示例 - 其他
- 文心一言-百度上线“文心一言”付费版本,AI聊天机器人市场竞争加剧 - 其他
- 数据库-MongoDB常用的语句 - 其他
- flink-Flink(三)【运行时架构】 - 其他
- java-Windows 安装 Maven - 其他
- 爬虫-使用JavaScript编写游戏平台数据爬虫程序 - 其他
- python-Python(七) 元组 - 其他
- 编程技术-liunx的启动过程 - 其他
- rust-Rust教程7:Gargo包管理、创建并调用模块 - 其他
- c#-顶顶通语音识别使用说明 - 其他
- stm32-FPGA与STM32_FSMC总线通信实验 - 其他
- spring-springboot集成redis -- spring-boot-starter-data-redis - 其他
- ios-LibXL 4.2.0 for c++/net/win/mac/ios Crack - 其他
- unity-Unity DOTS系列之System中如何使用SystemAPI.Query迭代数据 - 其他
- 网络-openssl+SM2开发实例一(含源码) - 其他
2):严禁色情、血腥、暴力
3):严禁发布任何形式的广告贴
4):严禁发表关于中国的政治类话题
5):严格遵守中国互联网法律法规
6):有侵权,疑问可发邮件至service@yxfzedu.com
- rabbitmq-RabbitMQ的高级特性
- 数据库-长安链可验证数据库,保证数据完整性的可信存证方案
- 前端框架-React Hooks为什么要在顶层使用?
- flink-Flink之Java Table API的使用
- c#-C# List<T>.IndexOf()方法的使用
- 计算机视觉-Libra R-CNN: Towards Balanced Learning for Object Detection(2019.4)
- ar-Angular 由一个bug说起之一:List / Grid的性能问题
- vr-VR全景技术,为养老院宣传推广带来全新变革
- 网络-【广州华锐互动】VR安防网络综合布线仿真实训打造沉浸式的教学体验
- list-使用多线程处理List数据
