00.前言
最近在讲解Linux内核kernel patch的实现原理, 其中不乏优秀的开源项目和内核大神, APatch就是其中之一.
APatch借鉴了magisk patch init和selinux的方式在内核层实现了hook(注意b跳转相关hook, 非inlinehook). 思维巧妙有较高的学习意义.
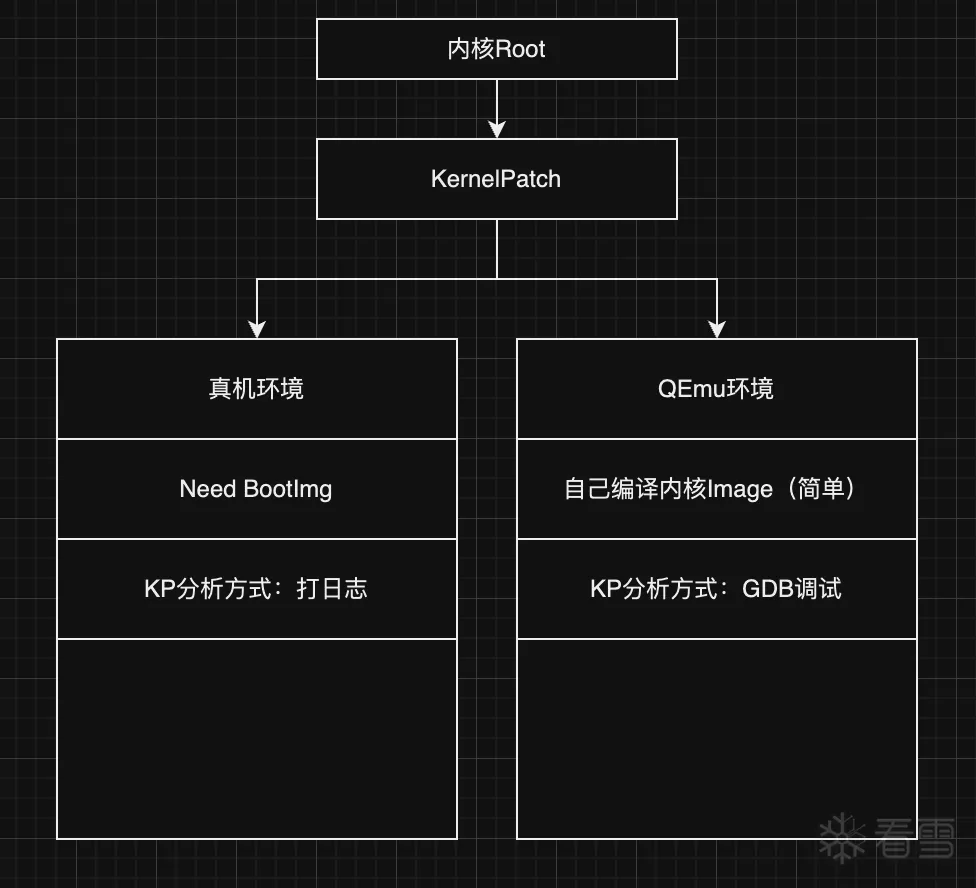
但是在上手探究原理的过程中, 如果使用真机的方式, 简单修改就会卡机, 需要重刷等.
好的环境是好的开始的前提, 因为我们是探究其原理, 简单过一下项目其实现方式与平台无关, 因此可以通过内核模拟的方式, 使用GDB探究其中的每一步实现, 完美规避.
01.内核Root的实现方式:
- 直接编译对应源码
- 针对内核打patch
- 漏洞利用

02.模拟环境搭建
系统环境配置【必备】
强烈建议使用Ubuntu22.04(http://mirror.nju.edu.cn/ubuntu-releases/22.04.4/ubuntu-22.04.4-desktop-amd64.iso)
安装Qemu
1 2 3 4 5 | sudo apt update
sudo apt-get install qemu qemu-system qemu-user
root@happy /s/qemu_linux
QEMU emulator version 6.2.0 (Debian 1:6.2+dfsg-2ubuntu6.19)
Copyright (c) 2003-2021 Fabrice Bellard and the QEMU Project developers
|
注意:不同的qemu版本可能起始的物理地址不同,本人电脑使用ubuntu22.04自带版本,6.2.0
03.编译Linux内核
要求:最好自己折腾, 也可以使用我准备好的。
https://github.com/nzcv/KernelPatchQEMU/releases/tag/dev1.0.7(手动编译查看github/workflow)
1.1 使用交叉编译器或者直接官方网站下载:
1 2 3 | sudo apt-get update
sudo apt-get install gcc-10-aarch64-linux-gnu
sudo mv /usr/bin/aarch64-linux-gnu-gcc-10 /usr/bin/aarch64-linux-gnu-gcc
|
1.2 下载4.15.2内核
1 | > curl -L -O https://cdn.kernel.org/pub/linux/kernel/v4.x/linux-4.15.2.tar.gz
|
1.3 快速编译命令
1 2 3 4 5 6 | sudo apt-get install git
git clone https://github.com/nzcv/KernelPatchQEMU.git
cd KernelPatchQEMU
make ARCH=arm64 CROSS_COMPILE=aarch64-linux-gnu- defconfig
make -j$(nproc) ARCH=arm64 CROSS_COMPILE=aarch64-linux-gnu-
|
04.内核去掉编译优化
要求:最好自己折腾,也可以使用已修改版本
1.1 参考链接
https://blog.csdn.net/liuyinggui163/article/details/126877114
http://m.blog.chinaunix.net/uid-21419530-id-5835399.html
1 2 | //使用工程内部直接patch
patch lib/Kconfig.debug < ../patch/Kconfig.debug.patch
|
05.内核编译指令
1 2 3 4 5 6 7 | make menuconfig ARCH=arm64 CROSS_COMPILE=aarch64-linux-gnu-
//default and save exit
make defconfig ARCH=arm64 CROSS_COMPILE=aarch64-linux-gnu-
make -j8 ARCH=arm64 CROSS_COMPILE=aarch64-linux-gnu-
其他配置:
CONFIG_DEBUG_KERNEL=y
|
06. 制作Linux根文件系统
6.1 编译busybox
https://busybox.net/downloads/?C=M;O=D(busybox)
1 2 3 4 | make menuconfig ARCH=arm64 CROSS_COMPILE=aarch64-linux-gnu-
Settings --->
[*] Build static binary (no shared libs) //静态编译
[*] Build with debug information //可选,带调试信息,方便后续调试
|
6.2 制作initrd
1 2 | make ARCH=arm64 CROSS_COMPILE=aarch64-linux-gnu- install
find . | cpio -o --format=newc > ../rootfs.img
|
07. 内核启动脚本
// makefile
1 2 3 4 5 6 7 8 9 10 11 12 13 14 15 | init:
cd ./initramfs && find . -print0|cpio --null -ov --format=newc|gzip -9>../build/initramfs.cpio.gz
run:
qemu-system-aarch64 -kernel Image -initrd build/initramfs.cpio.gz -m 1G -nographic --append "earlyprintk=serail,ttyS0 console=ttyS0"
run2:
qemu-system-aarch64 -M virt -cpu cortex-a57 -smp 1 -m 1G -kernel Image -nographic -append "console=ttyAMA0 root=/dev/vda oops=panic panic_on_warn=1 panic=-1 ftrace_dump_on_oops=orig_cpu debug earlyprintk=serial slub_debug=UZ" -initrd build/initramfs.cpio.gz
old:
cp ../linux-4.15.2/arch/arm64/boot/Image .
qemu-system-aarch64 -M virt -cpu cortex-a57 -smp 1 -m 1G -kernel Image -nographic -append "console=ttyAMA0 oops=panic panic_on_warn=1 panic=-1 ftrace_dump_on_oops=orig_cpu debug earlyprintk=serial slub_debug=UZ root=/dev/ram rdinit=/bin/sh" -initrd rootfs.img.gz -S -gdb tcp::9000
patch:
qemu-system-aarch64 -M virt -cpu cortex-a57 -smp 1 -m 1G -kernel Image2 -nographic -append "console=ttyAMA0 oops=panic panic_on_warn=1 panic=-1 ftrace_dump_on_oops=orig_cpu debug earlyprintk=serial slub_debug=UZ root=/dev/ram rdinit=/bin/sh" -initrd rootfs.img.gz -S -gdb tcp::9000
|
08.内核启动
- 内核搬运及启动
qemu启动kernel的部分在qemu源码路径:https://github.com/qemu/qemu/blob/01782d6b294f95bcde334386f0aaac593cd28c0d/hw/arm/boot.c#L63
1 2 3 4 5 6 7 8 9 10 11 12 13 | static const ARMInsnFixup bootloader_aarch64[] = {
{ 0x580000c0 }, /* ldr x0, arg ; Load the lower 32-bits of DTB */
{ 0xaa1f03e1 }, /* mov x1, xzr */
{ 0xaa1f03e2 }, /* mov x2, xzr */
{ 0xaa1f03e3 }, /* mov x3, xzr */
{ 0x58000084 }, /* ldr x4, entry ; Load the lower 32-bits of kernel entry */
{ 0xd61f0080 }, /* br x4 ; Jump to the kernel entry point */
{ 0, FIXUP_ARGPTR_LO }, /* arg: .word @DTB Lower 32-bits */
{ 0, FIXUP_ARGPTR_HI}, /* .word @DTB Higher 32-bits */
{ 0, FIXUP_ENTRYPOINT_LO }, /* entry: .word @Kernel Entry Lower 32-bits */
{ 0, FIXUP_ENTRYPOINT_HI }, /* .word @Kernel Entry Higher 32-bits */
{ 0, FIXUP_TERMINATOR }
};
|
它是针对地址处的入口点进行编译的0x40080000。
这个确切的地址来自 QEMU 虚拟设备的设计:
0x00000000 - 0x3FFFFFFF是内存映射外设的区域。使用此范围内的地址,您可以访问多个外设的寄存器来配置和控制它们,就像我们使用位于 0x09000000UART 的输出寄存器将文本字符串输出到终端一样。
0x40000000 - 0x4007FFFF是为引导加载程序保留的区域。
并且内核(或任何裸机应用程序)正在加载到地址 0x40080000。外围设备的寄存器
初始地址,即您的内核将被加载到的位置取决于引导加载程序的实现,如果您使用现有的硬件或模拟器,那么您很可能会处理现有的引导加载程序,它会将您的内核文件加载到某个预定义的地址。
2. 断点调试验证
1 2 3 4 5 6 7 8 9 10 11 12 13 14 15 16 17 | (gdb) x /16i 0x0000000040000000
=> 0x40000000: ldr x0, 0x40000018
0x40000004: mov x1, xzr
0x40000008: mov x2, xzr
0x4000000c: mov x3, xzr
0x40000010: ldr x4, 0x40000020
0x40000014: br x4
0x40000018: .inst 0x48200000 ; undefined
0x4000001c: udf
0x40000020: .inst 0x40080000 ; undefined
0x40000024: udf
0x40000028: udf
0x4000002c: udf
0x40000030: udf
0x40000034: udf
0x40000038: udf
0x4000003c: udf
|
09.内核调试
https://github.com/lebr0nli/GEP (GDB必备)
https://web.mit.edu/gnu/doc/html/gdb_7.html (下断点)
内核启动后, 可以通过gdb单步调试理解其中细节
1 2 3 4 5 | set disassemble-next-line on
show disassemble-next-line
target remote :9000
stepi
break *address
|
9.1 因为内核在被执行之前还有bootloader的存在, 还记得前面qemu的bootloader实现么???
内核启动后我第一步想法是第一行运行代码是什么, 在什么位置呢, 对应的参数又是什么? 我的第一步想法是汇编入口加入延时.
入口延时
1 2 3 4 5 6 7 8 9 | ENTRY(stext)
mov x0,
.loop:
nop
subs x0, x0,
bne .loop
bl preserve_boot_args
bl el2_setup // Drop to EL1, w0=cpu_boot_mode
adrp x23, __PHYS_OFFSET
|
在汇编入口加入延时调试, 方便查看地址:
1 2 3 4 5 6 | (gdb) c
Continuing.
^C
Program received signal SIGINT, Interrupt.
0x00000000410d0004 in ?? ()
=> 0x00000000410d0004: 1f 20 03 d5 nop
|
qemu bootloader传入的参数
1 2 3 4 5 6 7 8 9 10 11 12 13 14 15 16 17 18 19 20 21 22 | x0 0x48200000 1210056704
x1 0x0 0
x2 0x0 0
x3 0x0 0
x4 0x40080000 1074266112
x5 0x0 0
x6 0x0 0
x7 0x0 0
x8 0x0 0
x9 0x0 0
x10 0x0 0
x11 0x0 0
x12 0x0 0
x13 0x0 0
x14 0x0 0
x15 0x0 0
x16 0x0 0
x17 0x0 0
x18 0x0 0
x19 0x0 0
x20 0x0 0
x21 0x0 0
|
10. 使用APatch进行Kernel Patch
前面只是自己编译内核并跑了起来, Apatch对应的APK功能包含boot.img解包并提取内核, 进行patch. 因为我们已经有了内核文件
所以可以直接命令行patch
1 2 | /data/data/me.bmax.apatch/patch
adb pull /sdcard/Download/Image2
|
Patched后再到qemu环境里面去跑起来看看吧?? 相信你一定会有所收获
11.其他帮助
https://zhuanlan.zhihu.com/p/345232459
https://www.bilibili.com/video/BV1Kd4y1R7tV(X86,但可以借鉴busybox制作)
https://www.zhihu.com/people/nobody_know/posts
https://zhuanlan.zhihu.com/p/667525514
https://developer.arm.com/downloads/-/arm-gnu-toolchain-downloads
最后于 3小时前
被周晓梦Chew编辑
,原因:

